Cycling is one of the best ways to stay fit, sightsee, and even clear the mind; nothing can ever disrupt a good cycling experience like a flat tire. Knowing how to fix a flat tire quickly saves time, money, and frustration, whether you ride daily or just on weekends. Know that this guide will help you get back on the road so that you can scale out your dreams in cycling without any doubt.
What You’ll Need to Fix a Flat Tire
Before you go from one cycling trip to the next, be sure to have a basic repair kit at hand. Here’s what you would need if you want a quick repair for a flat tire:
- A spare inner tube or a patch kit
- Two tire levers should be sufficient
- A portable bike pump or CO₂ inflator
- Multi-tool (Optional but Helpful)
These tools are small and lightweight, therefore easy to carry in a saddle bag or backpack. You want them with you when you need to fix a flat without having to walk your bike back home.
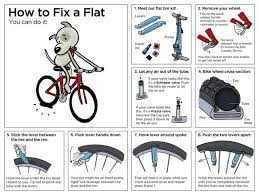
Step-by-Step Guide to Fix a Flat Tire on the Go-
1. Remove the Wheel
Shift your chain onto the smallest gear on your cassette before you remove the rear wheel. This makes reinstallation easier. Open the brake (if needed), and use the quick-release lever or wrench to remove the wheel.
2. Take Out the Flat Tube
Use your tire levers to pry one side of the tire off the rim. Carefully pull the inner tube out, starting near the valve. Inspect your tire carefully for sharp objects to prevent future flats.
3. Inspect and Patch or Replace
Slightly inflate the tube, and listen or feel for any air escaping. If it’s a small hole, take your patch kit. Otherwise, replace it with a new inner tube. Hollow out your tire by checking for glass or thorns. Put your new tube inside.
4. Reinstall and Inflate
Insert the tube valve through the rim hole and push the tube into the tire. Use your hands to press the tire bead back onto the rim. Inflate it to the correct pressures while making sure the tube isn’t pinched.
5. Reattach the Wheel and Test
Slip it back in place, lock the brakes, and ensure it spins freely. Do a short test ride to confirm that the repair worked.
Cycling Safety Tips After a Flat Repair
Once you fix a flat, give your whole bike a once-over. Flats can cause damage to rims or misalign some components. Check the following:
– Make sure the tire bead is seated properly on the rim
– Make sure the brakes are working
– Make some listening to abnormal noises while you ride
– Keep an eye on the tire pressure over the next few hours
Alertness can keep further complications from arising, and perhaps more importantly, maintain safe, uninterrupted cycling.
Why Every Cyclist Should Know This Skill
Flat tires are something that every cyclist must face at one point or another. But the ability to quickly remedy such inconvenience makes one bold enough to ride longer distances with confidence. It also promotes self-reliance, which is important if cycling becomes part of what one does, whether for recreation, transport, or sport.
Just like you wouldn’t start an online game like those found on Khelraja without even a slight understanding of what the basic rules are, so one should not hit the road without knowing how to handle minor bike repairs. Preparedness is a part of the cycling lifestyle.
Practice Makes Perfect
The first time you fix a flat tire might take a while. But with practice, you’ll have it down in 10 minutes or less. Try doing a dry run at home so that you’re not figuring it out for the first time on the side of the road. That way, when the time comes, you’ll fix your flat and keep your cycling journey on track, fast and stress-free.